Thursday, August 30, 2012

Altered Book = Handmade Journal - Part 2


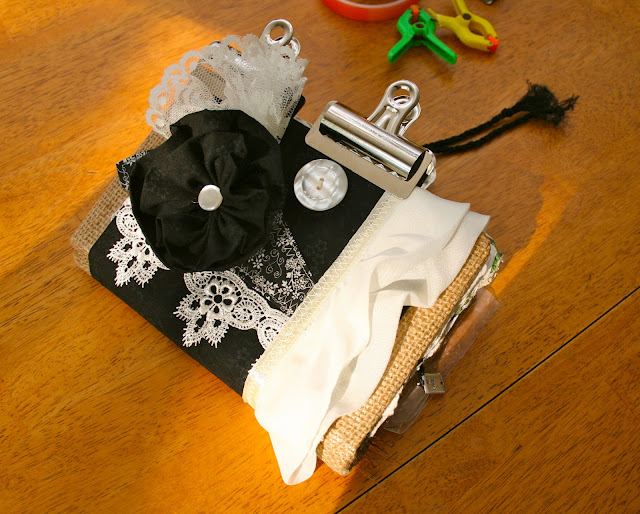
Completed cover for my altered book

I did a post on on this altered book a few weeks back but I didn't have the cover completed.   Finally got some time to do that today.


I work on the floor a lot.  I had a number of things I thought about using and didn't.


Here's what I learned doing this one today.   Lay out what you think you want to use and place it on the cover where you think you want it before you started sewing or gluing anything.  Take a picture when you finally get it the way you want it.   That way you can do things in the correct order because it's layered.  I forgot the order and did one layer too soon and it changed my final lay-out.   


After my cover was all sewn....I already had the book covered in burlap and just needed to sew the wrap of black material with the laces and fabric flowers etc... I attached it using pvc glue to the burlap.

I use these clips a lot to hold things together while glue sets and dries.  


I was happy with the finished journal.


This is another one I had shown in the last post about handmade journals.   I had the cover made but not put on the chip board yet.   I am using this as my budget book and needed it to be expandable.  I have pocket in it for bank statements, bills, I made checkbook registers the size of the book and as well as ledger pages.  The medallion on the cover has the serenity prayer on it.... fits with budgeting many months.

 After doing a book put together with rings and an altered book I prefer the altered book in the end.  Altered books are certainly more work but I like the finished product enough to do it that way again. 

I am going to start on the family album next as an altered book.  I am so excited to do that one with the amazing fabric and stones!


Elizabeth  

Edited 9/4/12  -

I'm including a picture of the original book as I've gotten a number of questions about it.   It was covered in burlap first and then the inner book was redone with new paper, pictures and embellishments that were meaningful to me.  The last step was the cover.
  

Tuesday, August 28, 2012

Eggplant Parmigiano


Eggplant Parmigiano


2 medium to large eggplants
8 eggs
1 - 1 1/2 cups of milk
3 cups bread crumbs
 oil to fry eggplant in
6 cups marinara / spaghetti sauce
3 cups mozzarella cheese
3/4 cup parmesan cheese
salt to taste


Put 2 eggs and some milk in shallow dish and wisk as you would for scrambled eggs
put a cup of crumbs in another

use remaining eggs 2 at a time, milk and crumbs to replenish each plate as you use up what is in them


dip eggplant in egg mix and then dredge in crumbs
repeat with the same piece of eggplant to get 2 coats of crumbs on each piece


heat oil 
fry each piece of eggplant, turning when browned until soft
place on paper towels as you take them out of fry pan


When all pieces are browned
Preheat oven to 350 

Assemble in a 13" x 9" casserole pan

pour or spoon enough sauce into bottom  of pan to cover it
add layer of eggplant on top of sauce
add another layer of sauce
add layer of grated mozzarella cheese on top of sauce
repeat layer of eggplant using all of it up
if you have pieces on top of pieces that's fine
Repeat layer of sauce and top with remaining mozzarella and parmesan cheese

Put in oven and cook until cheese has bubbled and browned some - about 40 min.


Enjoy!


Monday, August 27, 2012

Ivy Corner Garden Center


This is Homer.  Homer is the official greeter for the Ivy Corner Garden Center.  

Saturday I visited the garden Center just to see what was new.   I always love visiting here.  You never know what new treasure you may find here.  Its one of those eclectic places that doesn't really fit any typical description.  Maybe a bit bohemian feeling.  It's situated on a corner and the building is attached to the Ivy Post Office in small town fashion.   On the roof the chimney has an extra large quarter moon and some stars made of wire and strung with lights to give a silhouette of twinkle lights at night.  


There is never a shortage of things to look at inside.  Although they carry some standard garden products and tools much of what they carry is local made and interesting because its not what you find everywhere else.    


The whole inside is broken up into rooms of various merchandise.    Outdoors in the back is where the shrub and tree inventory is along with miscellaneous pots, fountains and other garden ornaments.  It was pretty much pouring outside when we were there so I didn't take any pictures outside fearing my camera wouldn't like getting that wet.

I left empty handed save the few pictures I took but it was fun walking through none the less.   I love these sort of places that are unique and treasures unto themselves.


Elizabeth

Saturday, August 25, 2012

It's Raining!


We are having a wonderfully rainy day today.  I love days that are just a steady rain all day.  No       lightening or thunder or pelting rain that just washes away topsoil and is over too fast for it to really sink deep into the soil where it's so desperately needed.  Just slow steady rain.  I love them not just because of the obvious need for rain but also for the opportunity to spend a day playing catch-up inside.  I always have the urge to make soup on days like this.   Rainy days are comforting days for me.   

Later,  I am planning a trip to the local garden center followed by an evening of cooking and working on journals.  I will take my umbrella and know even for a Sat. I will have the place pretty much to myself because most people won't come on a rainy day.

Elizabeth

Ps

As you may or may not have noticed, I have missed the last 2 frugal Fridays posts.  I seem to have developed a mental block about this so am scrapping it in favor of just posting something frugal when it hits me.  I have never been good at boxing myself into something like that but felt the need to try one more time and hence, prove to myself I am still not good at it. 


Thursday, August 23, 2012

On The Homesteading Bookshelf


Some of my favorite Homesteading Books

Last night after my T-post adventure yesterday I went to look up something about fencing for animals and realized how many books on homesteading I had that I hadn't looked at in what seems like forever. I took a couple to read in bed last night...at least thumb through before I drifted off.    I had forgotten about some of them and was pleasantly reminded of how much information I had at my fingertips.   

I've got tons of gardening books because of my career in horticulture but these are homesteading, animal and cheesemaking books.

Of the books above my favorite for inspiration is the Paul Heiney "Country Life".
Sheep, Goats, Cattle and Pigs by Carol Ekarius is great for learning breeds of farm animals.  
Homemade is a favorite for simple things to build around the homestead but if your already handy building it may be too simple.  It was perfect for me when I was starting out.  I have a How to raise Goats that isn't in that stack but it's great too.  It's like the How to Raise Poultry and How to Raise Pigs that are in the stack and by the same publisher.   It also had some good pictures of thing I wanted to build in it.  The Chicken Health Handbook was a help with sick or injured chickens on occasion.  How to Build Animal Housing and Chicken Coops were both fun to look at and maybe someday....


The Goats Produce Too! is one of my favorite beginner cheesemaking books.  I started out with the book by Rikki Carroll but found this to be more beginner friendly.


I pulled some of my old Mother Earth News, Hobby Farms and Hobby Farm Home magazines out too along with the random copies of Backyard Poultry, Dairy Goat Journals, Grit and Mary Janes Farm.
Magazines are always a source of inspiration to me.  Being a visual type the pictures give me so many idea's of things I want to do or could do around here.     The lot will stay in a pile by my chair to thumb through for the next few months whenever I have time.  I frequent our library regularly too and am able to check out many there as well.  

So what's on your homesteading library shelf.  I would love to hear about your favorite books so please share.


Elizabeth

Lacie and Belle Featured over at Farmer's Daughter


If' you visit here much you know Farmers Daughter blog has been on the blog roll for a while so it was an honor to hear A Tiny Homestead's "Doelings Belle and Lacie  was chosen as her featured post this week in her Homestead Link-Up.   

If you've got a blog and haven't participated in a link up yet you should give it a try.  They are free, easy and fun.  We have one going here as well.  Ours started on Monday and goes for 2 weeks since it was our first one.

Link up's I know of going on now.


Elizabeth

Wednesday, August 22, 2012

More Goat Business

The day was spent pounding in T-posts for the goats and hauling goat panels.  I had taken down all the goat panels from when I had goats before and put them in the back yard where the dogs are as an extra area for them.   The doelings are small enough not to challenge the hog panels yet but I thought I might as well get the fencing back in now before they need it.

While I was pounding in the T-Posts Malia was making a hay rake in the goat hut. She had remembered how I had made one from cattle panels last time and made another one just like it.   She also got a few cinder blocks, a big piece of thick plywood  and some hay and made them a raised bed.  It's so nice having her be old enough to be a real help this time.  She even pounded T-Posts for a while.  

When we picked the goats up one of them, Belle, was pretty skittish about being handled so we put up the hog panel area just out front of our house knowing we would give them more attention that way.  We put a picnic umbrella up in their pen that covered the dog crates we put in there and then put plywood on top of them with hay on it and a ramp up to the top and they've been pretty happy there.  With the umbrella covering it they have stayed dry even when it rained.  I don't think they've gone inside the dog crates since getting here.  The breeder had kept them in a dog crate at night so she could milk their mother in the mornings so they were used to them but they like being on top better.  

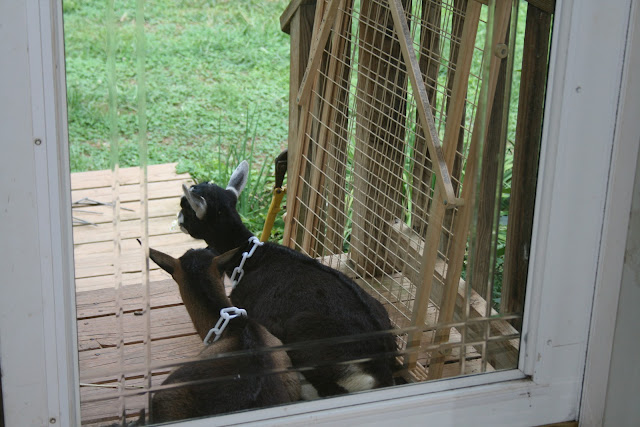
Yesterday putting collars on them was very traumatic for poor Belle.   She got herself squished between the railing and the nest boxes on the front porch trying to get away from.  Normally she does come up to us, she just doesn't like to be held.  And of course we had to hold her to put the collar on her.  Once she realized what we were trying to do she went into panic mode and got herself jammed in that corner.   I was afraid we had undone all the good we had accomplished in the time she has been here by cornering her to get the collar on but she seemed to be fine again 30 minutes later. 

Malia has been wanting to take them to the creek and I wanted to make sure they would follow us first and have collars on them too.   Maybe next week.   It was always fun to take our other goats on a hike through the woods to the creek.  We would pack a lunch and bring some books and spend a few hours there.   It's a short hike through the woods behind our house but it feels so remote and far away when we go.  And of course the goats have their own lunch along the way too which our older does always seemed to appreciate.   Something new to eat.

Hopefully I'll get the fence finished tomorrow and they can start sleeping in the goat hut tomorrow night.


Elizabeth

Wordless Wednesday - Baby Goats & Their New Momma


Tuesday, August 21, 2012

Prunus Serotina - Black Cherry or Wild Cherry


There is a lot of interest on this blog about the Prunus Serotina -Black Cherry, sometimes called Wild Cherry tree and how to identify it. Prunus Serotina is poisonous to animals when eaten when the leaves are wilted.  So when looking for a new area to put animals it's always wise to check carefully for these.   Where I am they are all over the place so they can be a nuisance.  

These are 3 tall black cherries in my backyard along the fence.  Scraggly and not very attractive.  


 This is a close up of the bark from one of the above black cherries.  Notice the bark on the trunk and on the branch sticking out on the right.


This is the Black Cherry in my front yard that was younger and much more attractive.  It's since been cut down because of the proximity to where the goats are.  You can see it was just loaded with berries when this photo was taken.


Here's a close-up of it full of berries.  It's also a fairly good picture of the leaves.


This is the bark from the tree in the front that was cut down.  It doesn't look all that similar to the picture of the trunk of the tall trees out back but it's the same tree.  They are both trunks of black cherries - Prunus Serotina


This was a limb from the one we cut down.  This is also how the trunk of a very young tree looks.  I think in real life they are tinged a bit more reddish.  Notice all the little horizontal lines on the bark.  Those are called lenticels and very prolific on young saplings.


This is a bit larger limb from the one cut down.  If you look at the picture of the first trunk above you'll see the limb sticky out on the right is marked just like this one.  And you can see all the lenticels still just like on the saplings

I suppose this shows how much the bark can change as a tree changes from a sapling to a young tree to an old tree.   You can see and learn the differences but it takes an observant eye. 


The leaves on the other hand stay fairly consistent.   They may be smaller or larger in size as the picture shows but the shape, color and characteristic serrulate (serrated) and incurved edges stay consistent from the saplings to the old trees.  These different sized leaves came from the same tree.


The berries are nice and I've made jelly from it that was amazing but I have no idea which recipe I used.  If I wanted to make some again I would modify another jelly recipe with somewhat consistent fruit to use because it was practically impossible to find a recipe specifically for black cherries.


I've also frozen some of the juice and used that for syrups and to flavor homemade ice cream.  The jelly, syrup and flavoring for ice cream were all delicious and well worth the trouble of collecting all those tiny little berries.   It seem like we went out every day with a ladder for 4 or 5 days collecting more to get enough to make.  The ones in the back are too tall to do that with and now we don't have the one in front either.  


Elizabeth

Monday, August 20, 2012

Hi - My Name is Elizabeth And I am Addicted to Books


I should never go to a bookstore without a chaperone to make sure things don't get out of hand.  I adore books and magazines are nearly impossible for me to walk away from if they are about paper arts.  They are my guilty pleasure.  


This Wordpress book was particularly appealing since it was 8 in 1 and about 750 pages.   I have been working on moving this blog over to Wordpress and actually have quite a bit of it done.   If you get a minute go to atinyhomestead.com  and let me know what you think.   I was sure I wanted to move the blog but I'm finding I've become attached to Blogger and am not so sure anymore.   It's just so easy compared to Wordpress. 

I know it's been confusing to some people because they are trying to get here and they forget to add blogspot to the url and end up there which is atinyhomestead but not quite.   

It was a wonderful afternoon in a bookstore with a cinnamon hazelnut coffee and arms full of books to browse through.   I can't remember the last time I did this but it was an indulgence thoroughly enjoyed.


Elizabeth

It's a Homestead Hop!


Your Invited!


I'm having a homestead hop and I'm cordially inviting you to join in!  

To join all you need do is enter your best homestead related blog post of the past 2 weeks below.  It can be any thing to do with your homestead; animals, recipes, gardening, tips, crafts, whatever.   Just as long as it's on topic for homesteading rural or urban.   Entries will be open for 2  weeks.  


It's always fun to find new blogs to go visit and what a great way to get your blog more exposure and visitors and maybe make some new friends along the way.


Hope you'll join in!


Elizabeth

Ps.....there is also another Barn hop going on  Here

It looks to be a good one too!

Sunday, August 19, 2012

Cattle Panel Structures and Snow Loads


Of all the posts I've done, the one that gets the most hits daily is the cattle panel greenhouse I built.  The next most popular post is about the cattle panel barn.   The other day I was on a forum and there was a discussion in progress about my cattle panel greenhouse and the question being debated was how much snow load could it stand.   Its a excellent question.

Over the years of homesteading I've built a number of structures with cattle panels.  They are easy up and easy down, wallet friendly and they serve the purpose of sheltering whatever it is your needing sheltered.   I've used them open ended for hay and for summer animal shelter.   I've used them for year round shelters with the ends closed up to house goats, pigs and chickens.  I've built the greenhouse which is meant to be a permanent  structure.  I love them and can't say enough good about cattle panel structures.  For animals worm loads in the ground around barns is a given but you can move these barns.  Maybe not yearly but every few years you can relocate them to fresh ground and leave the ground around where it was previously located.  In a few years you can again use that land to relocate your animals to after mother nature has had time to get the parasite load back down.  And with goats these parasites can literally be a killer.  


Still cattle panel structures have their share of problems.   Snow load being the biggest one unless you build it with that in mind.   You can see in the picture above what the weight of this little buckling is 
doing to this shelter.   Just the slightest build up of wet snow would do it in.    This one is very weak because it wasn't built like so many are with t-posts on the sides.   I used 4 x 4's for the base and attached the cattle panels on the bottom to it.   This makes for a very weak structure because it's only stable at the very bottom.  


This one here was my first one.  It was built with t-posts on the outside and I later added the ties to the front to hold in the bedding since we use deep bedding in winter.   It also had a cattle panel across the back which added more stability.   Even so one winter it started to collapse.   I normally go out every hour or so all night and day in a snow storm to brush them off.    This time it was either wetter snow or  I let it go a little longer.  It was 1/2 way down with about 6" of snow.  Maybe 4".   It wasn't tons to be sure.   The one the buckling is on above wouldn't have even been able to bear that.   

We got through it with a few 2 x 4's.   One along the roof and the others vertically to hold it up.  I worried of course the goats would hit them and knock them down but they didn't and we made it through the storm.


In these two pictures of the greenhouse you can see on the left it's leaning without even a tarp on it because it's only attached at the wood base.  I needed to add a board to hold it upright until I could add a crossboard.    And if they bend as the one in the brown covered one did it's going to be tough to fix.  These obviously aren't going to hold much snow.


On the other hand, once I added this support to the greenhouse I've gone through many storms, a few that really dropped a lot without having to do anything at all.  Of course this is Virginia.  If I were in Minnesota I would probably add 2 more boards going the length of it were the 3 cross boards are now.    And as it stands now the 3 boards going across the width of it hit the panels so its solid.  I don't worry about having to stay up all night to go shake or sweep this off.   

When I first started with cattle panel structures I thought I wouldn't mind when we got the occasional storm having to be up all night doing that but trust me....it gets old fast.    Still, if your in a pinch you can get by without support structure but only if you keep brushing it off.   All night long.  Sigh. 

I know some of you out there are using these.  Please if you have a better way share it with us.   I would love to have someone do a guest post on their way.  Or just add it to comments. I promise, it will get seen here.   This subject generates  1/2 the hits to this site.  We only get better by sharing.

Next I want to talk about weatherizing them for the animals so if you are already doing this share that too.


Elizabeth

Posts on building with cattle panels:

Building a Cattle Panel Barn
Building a Permanent Greenhouse with Cattle Panels

Related Posts with Thumbnails