Showing posts with label building things. Show all posts

Sunday, August 19, 2012

Cattle Panel Structures and Snow Loads


Of all the posts I've done, the one that gets the most hits daily is the cattle panel greenhouse I built.  The next most popular post is about the cattle panel barn.   The other day I was on a forum and there was a discussion in progress about my cattle panel greenhouse and the question being debated was how much snow load could it stand.   Its a excellent question.

Over the years of homesteading I've built a number of structures with cattle panels.  They are easy up and easy down, wallet friendly and they serve the purpose of sheltering whatever it is your needing sheltered.   I've used them open ended for hay and for summer animal shelter.   I've used them for year round shelters with the ends closed up to house goats, pigs and chickens.  I've built the greenhouse which is meant to be a permanent  structure.  I love them and can't say enough good about cattle panel structures.  For animals worm loads in the ground around barns is a given but you can move these barns.  Maybe not yearly but every few years you can relocate them to fresh ground and leave the ground around where it was previously located.  In a few years you can again use that land to relocate your animals to after mother nature has had time to get the parasite load back down.  And with goats these parasites can literally be a killer.  


Still cattle panel structures have their share of problems.   Snow load being the biggest one unless you build it with that in mind.   You can see in the picture above what the weight of this little buckling is 
doing to this shelter.   Just the slightest build up of wet snow would do it in.    This one is very weak because it wasn't built like so many are with t-posts on the sides.   I used 4 x 4's for the base and attached the cattle panels on the bottom to it.   This makes for a very weak structure because it's only stable at the very bottom.  


This one here was my first one.  It was built with t-posts on the outside and I later added the ties to the front to hold in the bedding since we use deep bedding in winter.   It also had a cattle panel across the back which added more stability.   Even so one winter it started to collapse.   I normally go out every hour or so all night and day in a snow storm to brush them off.    This time it was either wetter snow or  I let it go a little longer.  It was 1/2 way down with about 6" of snow.  Maybe 4".   It wasn't tons to be sure.   The one the buckling is on above wouldn't have even been able to bear that.   

We got through it with a few 2 x 4's.   One along the roof and the others vertically to hold it up.  I worried of course the goats would hit them and knock them down but they didn't and we made it through the storm.


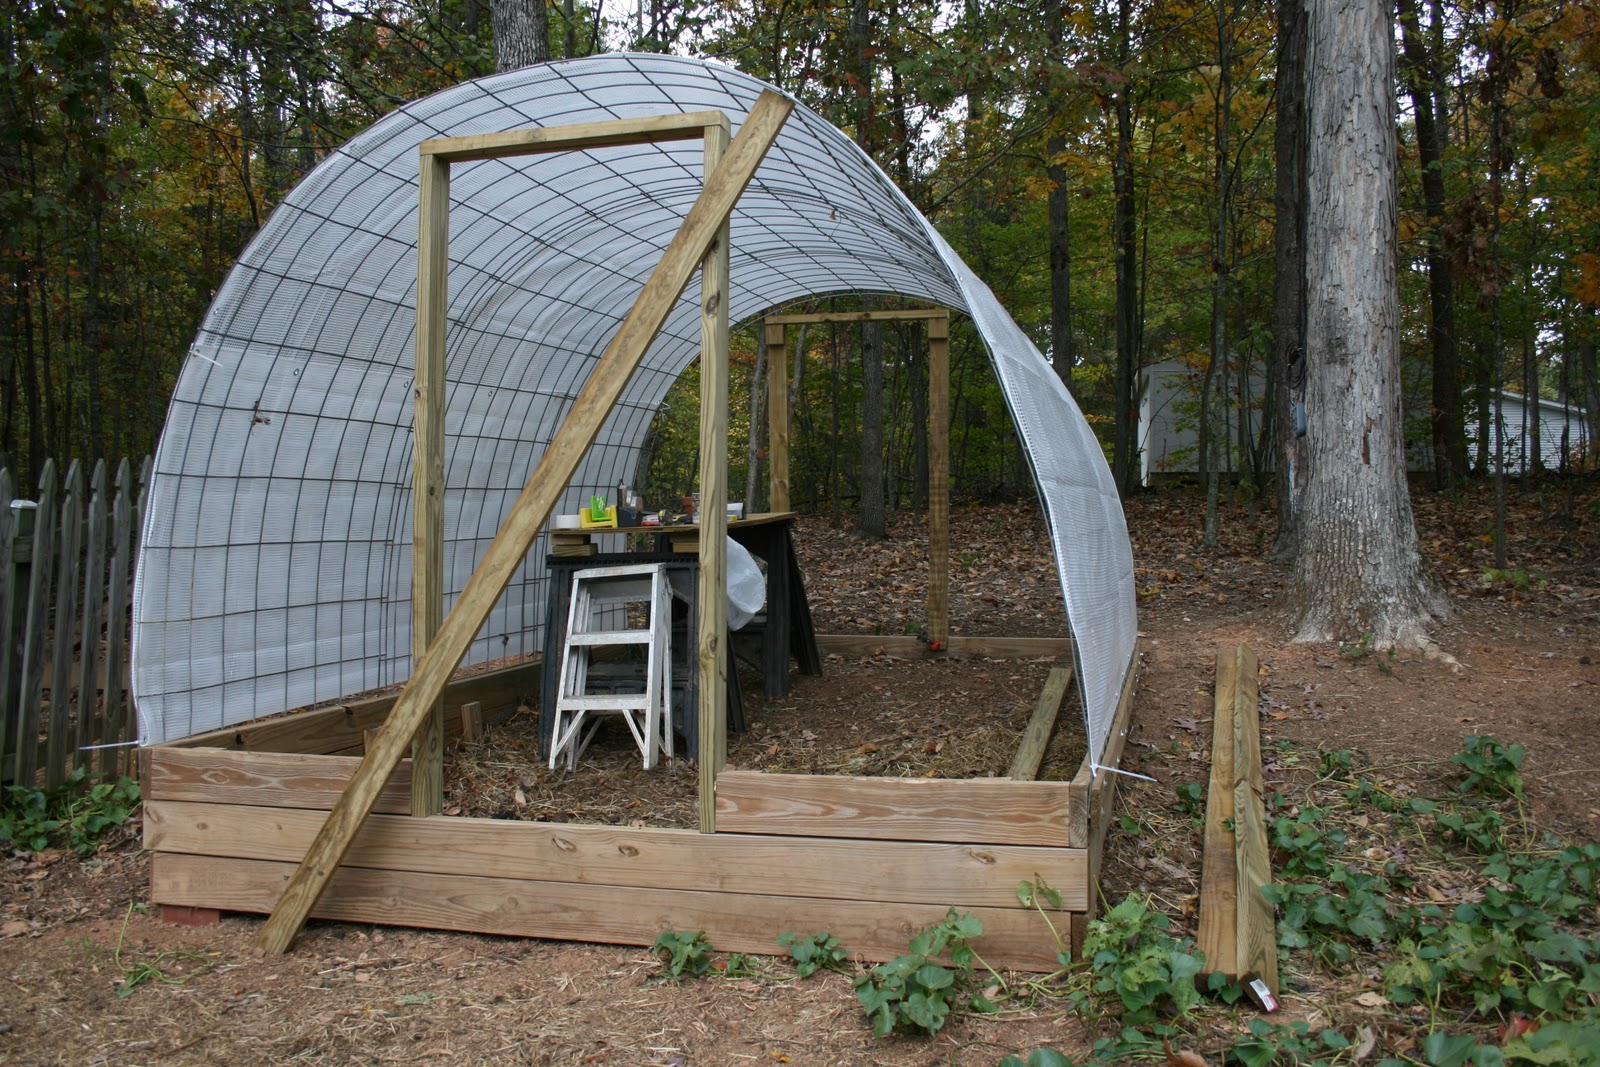
In these two pictures of the greenhouse you can see on the left it's leaning without even a tarp on it because it's only attached at the wood base.  I needed to add a board to hold it upright until I could add a crossboard.    And if they bend as the one in the brown covered one did it's going to be tough to fix.  These obviously aren't going to hold much snow.


On the other hand, once I added this support to the greenhouse I've gone through many storms, a few that really dropped a lot without having to do anything at all.  Of course this is Virginia.  If I were in Minnesota I would probably add 2 more boards going the length of it were the 3 cross boards are now.    And as it stands now the 3 boards going across the width of it hit the panels so its solid.  I don't worry about having to stay up all night to go shake or sweep this off.   

When I first started with cattle panel structures I thought I wouldn't mind when we got the occasional storm having to be up all night doing that but trust me....it gets old fast.    Still, if your in a pinch you can get by without support structure but only if you keep brushing it off.   All night long.  Sigh. 

I know some of you out there are using these.  Please if you have a better way share it with us.   I would love to have someone do a guest post on their way.  Or just add it to comments. I promise, it will get seen here.   This subject generates  1/2 the hits to this site.  We only get better by sharing.

Next I want to talk about weatherizing them for the animals so if you are already doing this share that too.


Elizabeth

Posts on building with cattle panels:

Building a Cattle Panel Barn
Building a Permanent Greenhouse with Cattle Panels

Wednesday, December 8, 2010

Cattle panel barn

As promised, more on building a cattle panel barn.
  
After deciding where I wanted it I had to cut down some small caliper tree's to clear a place.   My entire property is on a slope and this postage stamp sized piece is no different.  You just learn to compensate. 
I wanted it 16' long and 10' wide.  This would mean 6 cattle panels; 1 for each side and then 4 for the top. Notice the watering can in the picture?  If your ground is dry when pounding in T posts take a watering can with you.  Start your hole.  Pull the post out and fill the hole with water a few times.  It will go in much easier after that.


With the two sides in place I put a board in front to see how off level it really was.  Over a foot.  


Next you attach the 4 top pieces.  It's pretty easy if there are 2 of you but because it's just me and a 10 yr old here I have to be creative sometimes.  I'm going to show you in detail how I did it so if any of you want to build one but think you can't because you don't have help, now you will know how. 
First I put 2 -  2 x 4's across resting in the first square of each side to hold the cattle panel as I feed it across.   Then I use a T I made to raise it.


Once it's standing up like this go to the first side and using a double end snap or some other similar type clip and clip the top cattle panel  to the side panel in  a couple of places.  Then go to the other side and do the same thing.  It doesn't matter if it's even or not at this point.  You just want it attached on both sides somewhere.  After that you can start going from side to side raising it to the desired height.   Mine is overlapping two squares on each side.   This means it's 22' from the ground on one side to the ground on the other and it's approximately 8' high.  Remember I'm on a slope.    Then do the same thing for the next 3 panels.


Next using zip ties attach the panels to each other and to the sides.  I use a bunch...their cheap and worth it.  I did also use end caps on the T posts.  When you have all on you want, cut off the ends.   Next I started to level up the front with 4" x 4" ties.  

About this time it was getting late and the forcast was for rain so I stopped working on the outside and cut the plastic for the top.  I used 6 mil clear plastic from Lowes.  I buy the rolls that are 20' wide by 100' so I just cut 2 pieces 24' long to go over it making the top 12 mil.   Once the two pieces were over it I took a 2" x 6" x 16' board and put it up against each side to hold the plastic in place on the ground.  I added 2 pieces of  4' x 8'  1/2" styrofoam floor inlay between the panel and the plastic with the reflective side to the animals and then hammered 5 or 6 pieces of 24" rebar into the ground tightly against the board to hold the board in place on both sides against the cattle panel.

Next I started on the inside.  I cut some panels up to make a divider in the center to separate the pigs and goats with a gate in the middle.  I did the same for the front and the back so they could be locked in.  I laid a bunch of hay with the majority going on the low side so I will eventually have a really deep bed there for them.   I added animals and declared myself done for that night.


The rain started just as I finished up and everyone got tucked into their new home.  I didn't even have the fencing around it yet so I just locked them in.  With the rain, they didn't mind that at all.


Later I added plastic to the front and back for warmth and wind protection.  I still need to finish the ties in the front and back and I will also add some to the middle so the divider is level.  If your doing this on level ground you won't have to do that although I like the look of the ties.   I will add a proper doorway like in the greenhouse just wider and a few shelves and a milk stand.   This structure would also be great for hay storage.  I will probably do a smaller one for that when I get this one done.   In the summer the ends can come back off and it's a run in.   In fall and spring you can have them partially open. 

I have also done these in smaller versions with just 3 arched cattle panels.  If you do it that way and you have goats, unless you add the styrofoam to the sides the goats, especially kids, will climb them.  The one I have now with the extra panels on the sides makes that impossible for them to do.


You can see he's already bending this one.  


Here's a bad picture of an older goat hut I had made of cattle panels.  It was small and the dark tarps made it cold even when the sun was out.  I used alligator clips to hold a tarp folded in half on the front.   I used two tarps for the back with a piece of foam sandwiched between them for warmth and wind protection.  I only had the foam go up the back 1/2 way so I could fold the top of the back down 1/2 way on good days to air it out more and let sun in.

All in all I like the big one I just put up best so far.  I will really like it when I'm done.  The two other ones are too small for a milk stand so we just clipped them to the fence or a cattle panel on the inside to milk but I really want to have a milk stand in there.  The extra height is good.  The good part about  all of these cattle panel structures is that they are so easy to put up you can try many versions over the years till you have just exactly what you want. For me, I also like being able to move them around so no one area gets too over grazed.

Sunday, December 5, 2010

A Barn


This is what we have been working on this weekend.   It's really quite spacious for a cattle panel structure.  It's 10' wide, 9'high and 16' deep.  It's divided in 2 on the inside and can be closed up to keep the animals inside if need be.  The sides are insulated mostly for protection from wind chill but it also helps hold temperatures up too.  It stays about 10 degree's warmer than outside at this point.  Sometimes cattle panel structures covered with plastic can have a condensation problem but were not having a problem with this.

I'm making clips to replace all the alligator clips. 

I've taken a bunch of pictures of it as it went up and of the inside and will post completely how we did it when I finish it.  There is much more I want to do to it  but it could stay as is for the winter and be a fine shelter with no additions to it.  It's nice having the pigs in the back which opens to their own fenced area in the back and the goats in the front opening into their own area but they are sharing body heat and it's one location for us to care for all rather than 2.    We already have a base of 8 -18" of hay in there.   The variance is due to the slope it's on.  I want to add a small raised area in there for the chickens too.

More later about it.  I do love those cattle panels!

Elizabeth

Sunday, November 28, 2010

New steps for the front porch


Finally got a picture today of the new landing steps I finished earlier this week.  Nice to strike one thing off the to-do list.

Elizabeth

Monday, November 22, 2010

Electric Fencing


  This was from day one of electric fence shopping.  I had started at Southern States as I needed hay and theirs is the best for small quantities.  The sales man, after listening to me tell him what I was trying to accomplish thought a solar unit would fit the bill with 3 8' ground rods and lots of various insulators.  He thought the poly twine rather than wire would be a good choice.  I bought it all.
Next I went to Tractor Supply because I needed to get sweet feed for the goats and pig food and I usually get it there. A sales guy came over as I was looking over their electric fence supplies and as we talked he suggested I get the thin poly tape because it would be more visible.  I, being totally befuddled by all of it at that point, agreed and bought 2 rolls of tape.   I then bought 20 black poly step in posts to use as line posts between t posts.  And I bought a tester,  more insulators, splicing and coupling pieces, parts to make a gate and a spool of wire.

I read the literature that came with th fence charger that night and then got online and talked to more knowledgeable pig people than myself about the charger I had chosen.  I was concerned there would be too much juice for the pigs and not enough for the goats and since I wanted to be able to use the same charger for both I wanted to make sure I had made a good choice.  Mostly the consensus was that solar wasn't reliable enough for what I wanted.  I would lose a lot of charge with tape and poly twine and it may not be strong enough. Evidently solar loses juice fast and would really be better for a simple short fence

The next day I had to go to Richmond so I stopped at Tractor Supply again bought a plug in 6 joule 100 mile model.... for my little 3 acres...Yikes!  

It really sounds like a lot and maybe it is but the more I learn about electric fences the more I think I will like this charger and that it's the right model for what I want.  I learned you can make many small area's of fencing plus do an entire perimeter and also run just one wire or two low wires like at nose level for the pigs or high like at nose level for a goat in hard fenced pens and do it all with one charger if you get the right one and plan it out.   And it's pretty portable compared to woven wire with it's many deeply driven wooden posts. 

I also stopped at Southern States again while in Richmond to get some white step in posts.  I had  looked through the Premier 1 fencing catalog and decided to get some for area's close to the house because I liked the aesthetics's of the white posts with the white tape and white poly twine.   Premier catalog is great with all the pictures in it for helping with design and to see how all the various parts should come together.


This is the charger I'm keeping.  I am going to build it a little box to hang it in made from exterior grade plywood.  I'll then hang the box in the greenhouse which will be right in the area where the fence will start. 

So, since I wanted the charger in the greenhouse I decided I needed  to get the bracing up and the ends on it first.  It was dusk by this time so the pictures aren't great but I got 2  - 2 x 4's screwed together and placed above the door in the front and the back running the whole length of it to brace the top to handle a good snow load in the winter.  It made it very tight and solid.   There is very little shake in it. 


Tomorrow I'll get the rest of the framing on it and then I can cover the ends, make doors and hang my charger.


Elizabeth

Tuesday, October 26, 2010

Building a permanent greenhouse with cattle panels - part 1

The greenhouse today - still a lot to do

Last year I decided I wanted to build a small greenhouse.  I wanted to have a place to start seedlings and be able to pot things in the spring out of the weather and then let them grow on till weather allowed them to go outside.   Since then I've also done a lot of reading about 4 season growing and decided I would like to incorporate an area in the greenhouse to do that too.   I wanted to do it as inexpensively as possible so decided cattle panels would be the way to go.   For anyone that doesn't know what they are, a cattle panel is fencing for livestock you can purchase in sections at Tractor Supply or a feed store.  It's comes in 16' lengths 52" tall.  They run about $20 each.  It's rigid and can be arched to make a structure 8' wide and any length depending on how many you use. I wanted it 8' x 12'.

Last summer I started the base.  It was hard for me to figure out because it was going to be located on a slope and I wanted a dirt floor without having to do ground work to level the area.    I also wanted to make the back end of it to be a place I could put the chickens for the winter so I lined the floor with hardware cloth so it would be predator proof.  

This was what I got done last year.


I added 3 cattle panels


To get the cattle panels on,  I start by clamping a 1" x 4"  board to the base.  I drilled pilot holes along the bottom of the board and then added 2" hex screws.  


I left the hex screws out about a 1/2" to 3/4" so  there was a gap between the base and the board so I could then slide the end of the cattle panel into the space.  The screws kept it from going all the way through to the ground.   When I got all three panels into the boards on both sides I added some  hex screws above so the cattle panels can't be raised.


Then I tightened them all using a socket wrench which makes it fairly fast compared to using a regular wrench.


The cattle panels were older and not as rigid as new ones are so they ended up leaning some.   I cut out a door way and then added a brace to straighten it out till I got permanent bracing in.  Then I added a doorway in front and in the back.


I added the tarp to keep my tools dry in case of rain while I am working on it. When both the front and back doorways are in I can add the bracing to the top by adding 2 - 12'  2 x 4's to the top of the doorways to make it strong enough to handle a snow load.  Right now the back door is only clamped. 


I did the back doorway differently.  You can also see a bit of the hardware cloth that is lining the bottom of the greenhouse.

Hope to get time later this week to finish the front and back but the pigs have been escaping daily so need to redo their situation first.  


Elizabeth

Other post about building with cattle panels


Related Posts with Thumbnails