Showing posts with label Gardening. Show all posts

Tuesday, August 21, 2012

Prunus Serotina - Black Cherry or Wild Cherry


There is a lot of interest on this blog about the Prunus Serotina -Black Cherry, sometimes called Wild Cherry tree and how to identify it. Prunus Serotina is poisonous to animals when eaten when the leaves are wilted.  So when looking for a new area to put animals it's always wise to check carefully for these.   Where I am they are all over the place so they can be a nuisance.  

These are 3 tall black cherries in my backyard along the fence.  Scraggly and not very attractive.  


 This is a close up of the bark from one of the above black cherries.  Notice the bark on the trunk and on the branch sticking out on the right.


This is the Black Cherry in my front yard that was younger and much more attractive.  It's since been cut down because of the proximity to where the goats are.  You can see it was just loaded with berries when this photo was taken.


Here's a close-up of it full of berries.  It's also a fairly good picture of the leaves.


This is the bark from the tree in the front that was cut down.  It doesn't look all that similar to the picture of the trunk of the tall trees out back but it's the same tree.  They are both trunks of black cherries - Prunus Serotina


This was a limb from the one we cut down.  This is also how the trunk of a very young tree looks.  I think in real life they are tinged a bit more reddish.  Notice all the little horizontal lines on the bark.  Those are called lenticels and very prolific on young saplings.


This is a bit larger limb from the one cut down.  If you look at the picture of the first trunk above you'll see the limb sticky out on the right is marked just like this one.  And you can see all the lenticels still just like on the saplings

I suppose this shows how much the bark can change as a tree changes from a sapling to a young tree to an old tree.   You can see and learn the differences but it takes an observant eye. 


The leaves on the other hand stay fairly consistent.   They may be smaller or larger in size as the picture shows but the shape, color and characteristic serrulate (serrated) and incurved edges stay consistent from the saplings to the old trees.  These different sized leaves came from the same tree.


The berries are nice and I've made jelly from it that was amazing but I have no idea which recipe I used.  If I wanted to make some again I would modify another jelly recipe with somewhat consistent fruit to use because it was practically impossible to find a recipe specifically for black cherries.


I've also frozen some of the juice and used that for syrups and to flavor homemade ice cream.  The jelly, syrup and flavoring for ice cream were all delicious and well worth the trouble of collecting all those tiny little berries.   It seem like we went out every day with a ladder for 4 or 5 days collecting more to get enough to make.  The ones in the back are too tall to do that with and now we don't have the one in front either.  


Elizabeth

Tuesday, July 31, 2012

Getting Volunteer Avocado Plants


I love volunteers!  They always feel like gifts.  An Avocado plant plucked from the compost pile.

 I tried sprouting these for years with minimal success using a few toothpicks stuck in the side of the seed to hold it up in a shallow dish with a little water in it.    Long ago I gave this up as a waste of time.   The past 2 years though I've found by just throwing them in the compost pile I end up with sprouted seeds ready to pot.  If you want an avocado tree and have a sunny place to keep inside for the winter give it a go.   I found this one last week and another one today just starting to sprout roots.   I've only had 4 or 5 avocados in the past few months so seems to me to be a darn good rate of success.   

I would love to hear what volunteers you all have had success with this year.

Elizabeth


Saturday, July 28, 2012

Frugal Fridays


Frugal Fridays

I am declaring Friday's to be Frugal Friday's from here on out.   Everyone is cutting back and looking for ways to make a dollar go further it seems, me included.   

If you have a good frugal tip please share it.  We can all use the help.  Or if there is something you feel your spending too much money on and think others are managing to do less expensively ask.  If your wondering about it someone else probably is too.   

Turning plastic food containers into garden pots


Although technically it's Sat., I haven't been to bed yet so it's late late Friday night in my world and this here will be the first Frugal Friday post.  

I have always got tons of plastic containers from sour cream or yogurt etc. around and I save them to freeze things in but still they add up.   I hate tossing them.  Plastic will be in our land fills forever and it just feels wrong to use them once and add to the growing mass of garbage in the world.  

I decided to use the extra ones I have on hand as plant pots in the spring rather than to buy peat pots.  Although they would be fine to use as is after being washed out, I wanted to dress them up just a bit so they were prettier to look at when I'm watering them.    

These are so easy to do.  First I cut the very top off with regular scissors.  Then I took a pair of my decorative scrapbooking scissors and cut again right next to the first cut,  to leave a pretty edge on them.  Michael's or any place that sells craft supplies sells these scissors for a couple of dollars in a variety of pretty patterns.  

Next I put a couple of coats of primer on them to they would hold a colored paint without it peeling right off.   When that was dry I used a cheap acrylic craft paint.  It took a couple of coats but I went from white to a medium brown.   Any color you like will do.  I'm messy when I pot things so I wanted them close to the color of the soil.   A terra cotta color might have been pretty too.


Then I punched 4 or 5 small holes in the bottom of each one and that was it.  I used a hole punch and hammer on a small craft mat to do that. 

  When they were really dry (24 hours later)  I took my fingernails and tried to scrape the paint off but it didn't come off like it would had I not used a primer first.   I didn't paint the bottoms so that if they sat in a wet spot for any length of time they wouldn't start to peel.   

Since I am always running short on pots in the spring when the seedlings need to get out of packs but it's too soon to put them in the ground these will help bridge the gap.


Elizabeth

Wednesday, November 10, 2010

How to get kids to eat turnips

Tell them no, they can not pick them.   They are planted for the goats and the pigs.

Tuesday, October 26, 2010

Building a permanent greenhouse with cattle panels - part 1

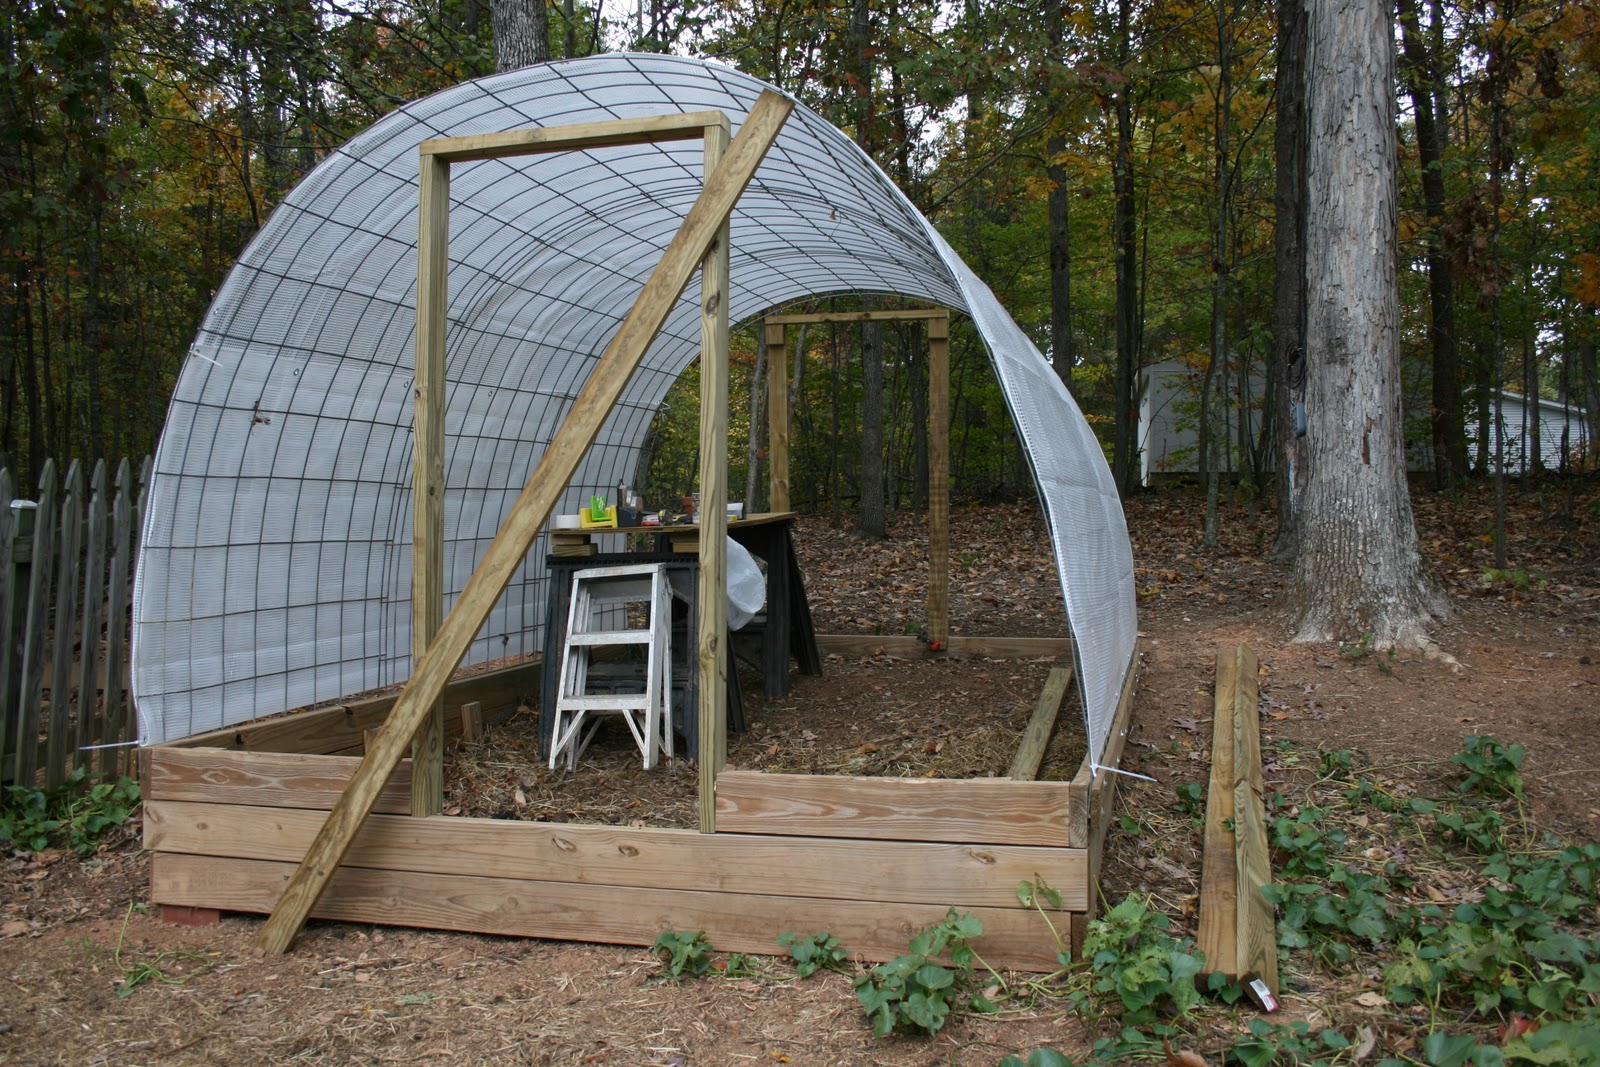
The greenhouse today - still a lot to do

Last year I decided I wanted to build a small greenhouse.  I wanted to have a place to start seedlings and be able to pot things in the spring out of the weather and then let them grow on till weather allowed them to go outside.   Since then I've also done a lot of reading about 4 season growing and decided I would like to incorporate an area in the greenhouse to do that too.   I wanted to do it as inexpensively as possible so decided cattle panels would be the way to go.   For anyone that doesn't know what they are, a cattle panel is fencing for livestock you can purchase in sections at Tractor Supply or a feed store.  It's comes in 16' lengths 52" tall.  They run about $20 each.  It's rigid and can be arched to make a structure 8' wide and any length depending on how many you use. I wanted it 8' x 12'.

Last summer I started the base.  It was hard for me to figure out because it was going to be located on a slope and I wanted a dirt floor without having to do ground work to level the area.    I also wanted to make the back end of it to be a place I could put the chickens for the winter so I lined the floor with hardware cloth so it would be predator proof.  

This was what I got done last year.


I added 3 cattle panels


To get the cattle panels on,  I start by clamping a 1" x 4"  board to the base.  I drilled pilot holes along the bottom of the board and then added 2" hex screws.  


I left the hex screws out about a 1/2" to 3/4" so  there was a gap between the base and the board so I could then slide the end of the cattle panel into the space.  The screws kept it from going all the way through to the ground.   When I got all three panels into the boards on both sides I added some  hex screws above so the cattle panels can't be raised.


Then I tightened them all using a socket wrench which makes it fairly fast compared to using a regular wrench.


The cattle panels were older and not as rigid as new ones are so they ended up leaning some.   I cut out a door way and then added a brace to straighten it out till I got permanent bracing in.  Then I added a doorway in front and in the back.


I added the tarp to keep my tools dry in case of rain while I am working on it. When both the front and back doorways are in I can add the bracing to the top by adding 2 - 12'  2 x 4's to the top of the doorways to make it strong enough to handle a snow load.  Right now the back door is only clamped. 


I did the back doorway differently.  You can also see a bit of the hardware cloth that is lining the bottom of the greenhouse.

Hope to get time later this week to finish the front and back but the pigs have been escaping daily so need to redo their situation first.  


Elizabeth

Other post about building with cattle panels


Monday, October 18, 2010

Looking back on this season

A bouquet from Malia's trip to the mailbox

Malia is home again after a month of public school.  Yea!!!!!  I had no idea how much help she is to me.  Well I did but sometimes we need a reminder.   I need to do a whole post on homeschooling versus public school one of these days.   Both last year and this year she's gone back for the first month to give it a try.   Next year that isn't an option for her.   She would be going to middle school and this grandmother isn't up for the transition from homeschooling to public school in those challenging middle school years.  The good part of her short stints in school like this is we both get to measure her progress with her age group academically and socially.  She's doing well.  I wish more parents were able to do this.  I feel blessed I am in a position to do this.  I know this isn't the case for everyone.


The veggie garden this year was successful in some ways and not in others.   The squash bugs certainly took their toll.  Only one lone Hubbard pulled through.  It was from a new shoot  grown after the battle was semi won.   The tomatoes mostly did well.  Roma's best, Better boys next with Beef master coming in last.   The peppers were terrible this year for a variety of reasons.   I had bought only 3 varieties; bell, ancho's and jalapenos.  I wanted habeneros too but couldn't find them.   My bells ended up being 1/2 bell and 1/2 cherry.   I have no idea what to do with the cherries so I threw most of them out until later in the season when I decided to freeze them whole until I could figure something out to do with them.  I'm still working on that.  The bell's really didn't produce all that well but the jalapenos did great.  The ancho's were practically tree's getting over 4' tall.  They would have done better had I gotten them in earlier and watered more. They had lots of peppers but they were small.


The butternut squash did outstandingly well.  As advertised, they held up well to the squash bugs and kept on producing through it all.  These are just a couple of the ones that are still out there ripening.  I have picked quite a few.   I now need to find recipes to use them all.  Mostly I love it boiled like potatoes and mashed.  I've never been a fan of it halved and baked although it is much easier than peeling it and boiling it.


The pea's Malia planted were ridiculous.  I believe the variety was Layton.   I wrote it down and will look later but they never got taller than 6 - 8 " tall.  


They've got these tiny little 1 1/2" pods on them with one or two pea's in them.   Yikes.  I would need an acre for just her and I at that rate.   The field pea's in my green manure are coming up normally and are about  2 - 2 1/2" tall now so it's the variety, not the soil.


The turnips I threw out into the squash patch in early August are doing well. They were planted for their greens for the goats and pigs.  There is also crimson clover, field pea's and orchard grass in there.  Later the pigs will be housed here for winter and can root it all up.  


This one has a bit of room around it so actually has some substance to it.   Most of them are much closer together because they weren't really being grown for their roots.

Most of the roots look more like this one.


The cool moister weather has given us another blooming time from the Clematis plant and the variegated miscanthus is now blooming as well.


In Aug. I cut this back to the ground because I was going to divide it and move it so I could better enjoy the Harry Lauder Walking Stick behind it.   I didn't get it moved but I learned something from the exercise none the less.  I always cut this back in the spring and then let it grow all season.   By this time of year though a rain will split it leaving it rather disheveled looking because it's so tall.   I've tried tying it up to hold it together with limited success.   Cutting it back in Aug though it's still very attractive now with plenty of blooms and because it's shorter it holds up to the rain.   I will always cut it back in Aug. from now on. 

The goats and the pigs need to be moved to their winter area's in the next few days which means building new housing for them.   Tina's still giving us 5 quarts of milk a day.   The pigs are enjoying all the acorns.  We have an abudance of them too due to the dry summer.   Mother natures way of ensuring the tree's.   Dry weather = more fruit.  Works with your tomatoes too.

Tuesday, September 7, 2010

Out & about in the garden


 Variegated Liriope starting to bloom.   I love that they persist into fall.


Tiny pea plants Malia planted ready to start blooming already.  They can't be more than 6 - 8" tall. 


A Jarradale pumpkin that has survived the squash bugs.   This variety of pumpkins along with the Butternut squashes seem to have a resistance to them.   Jarradales also will keep up to2 years if properly stored and produce quite a few more per vine than other varieties of pumpkin / winter squash.


A variegated Miscanthus getting divided and moved.  It was cut back about a month ago.  I then took a long ditch shovel and cut the root ball all the way around and let it sit.  Cutting all around the root ball severed  the roots which then encourages new feeder roots to develop prior to it being pulled all the way from the ground.   This way you have less shock when you bring it above ground to divide and transplant since new roots have already been formed.  It's more like transplanting from a pot this way.   The shrub behind it is a Harry Lauder Walking Stick and when the Miscanthus get tall it hides it so am glad to be moving this.


Moon and Stars watermelon that didn't get planted until July.   How do you know when to harvest them?   Anyone?   I have never grown watermelons before.


The only surviving blue Hubbard. The rest succumbed to the squash bug invasion.  I learned a lot this year about how to outsmart them and next year will be better prepared.  I am disappointed that I panicked and used pesticides and will be better prepared next year.  My goal is to not use any thing next year that isn't considered organic including fertilizers.

Friday, August 20, 2010

Cool mornings = thoughts of winter feedings

Blue Hubbard Squashes

The Blue Hubbard's I fretted over so much this summer are loaded with squashes.  More than I will use for the 2 of us for sure.  I also planted Jarradale pumpkins and Butternut squashes in the same area so everything could just vine out and mix  together without shading out less aggressive plants.  Anything we don't use can certainly be used as food for the goats, pigs and chickens over the winter.


A blue Jarradale pumpkin and a volunteer melon in back.  The melon plant, one  orange pumpkin plant and a tomato plant were volunteers from things we fed to the pigs over the winter, who were housed here.  Either the seeds passed through their system undigested or they weren't eaten and just laid dormant till this spring.


With the mornings getting a bit cooler it seems the foliage in this patch of squashes and pumpkins is starting to die back just a bit in the center and you can see ground where you couldn't a month ago.    My intent is to put the pigs back in there after I've harvested everything we humans can use and let them go to it at that point.   To maximize the amount of food  for them I sowed some Purple Top Turnips in there a few days ago.   I just threw seed througout the enter patch.  As the big leaves of the squashes die back the turnips will take over.  I don't think the plants will actually make the turnip bulbs because the soil is too hard in places there but still the abundant foliage will be a welcome addition to their diet. 


Turnip seedling planted Mon. already spouting amongst the pumpkins and squashes.   A bag of seeds from my local hardware store of common Purple Top Turnips was under $3 for a 4 ounce bag.   Some will get stepped on and trampled as I harvest in there but almost anything I get will make the tiny effort of scattering seeds worth the effort.   If you do it just before it rains you don't even have to water them in.   Mother nature can do that for you.


Turnips I sowed last summer growing throughout the pumpkin and squash plants this year.  


The barren area of this bed was planted this week with collard greens and kale for the goats for some much appreciated greens for winter feeding.  They love both.  The collards provide large leaves which means extra bang for the buck and the kale should stay going all winter so even in the coldest weather they will get the occasional addition of greens to their meals.   The bed looks smaller in this photo than it is.  I think it's about a 15' x 15'  area.

Monday, August 9, 2010

Making precious childhood memories in the garden

Malia planting pea's.... her favorite veggie and the first thing she's planted by herself.

By the standards most of the people of the world live by today we live a pretty slow and simple life here on this tiny homestead.  Malia and I are 50 yrs apart in age.  I'll be 60 this year and she just turned 10.   It's just her and I here.  We have no family locally and  I homeschool her.  She''s been with me since Thanksgiving day 8 yrs ago. We don't have tv most of the year because we're too rural for the local channels and if we have satellite we watch too much so I have it turned off a lot.   At 10 she's read a lot of the classics...Black Beauty, Alice in Wonderland, The Yearling and a number of others.   We talk of her going back to school so she has more contact with other children and more than likely she'll be in 4H this year, homeschooled or not.  

Some people would think it's a great way to raise a kid in today's world and others might consider it child abuse....no tv or video and only books, the woods and life for fun.   Either way, it's our life.   We have the animals...the pigs, goats, chickens, dogs and cats.  And that's great and can, at times be very exciting, like at baby time.    But I know in my heart some of her very best memories will be of our garden time.  

Every day we start out the same.   She gets the chickens out while I head out to the garden with a cup of coffee.  She joins me and we walk and look.   We talk about what's bigger or what's not bigger; what bugs there are, what flowers are blooming and  in plants like the squash or pumpkins, if it's the male or female flowers doing the blooming.  Sometimes we stop and pick something.  We talk of the great meals we will have this winter with what we are growing.  We watch the bee's do their busy work and walk somemore holding hands taking it all in.   It's a routine that is quietly solid.    She never fails to tell me " We sure have a great garden Grandma".    And I know these moments more than any others we share daily will stay in her heart and memory all her life as a time every day of  love.

A treasure found
Related Posts with Thumbnails